Arduino
Nano - Soil Moisture Study:
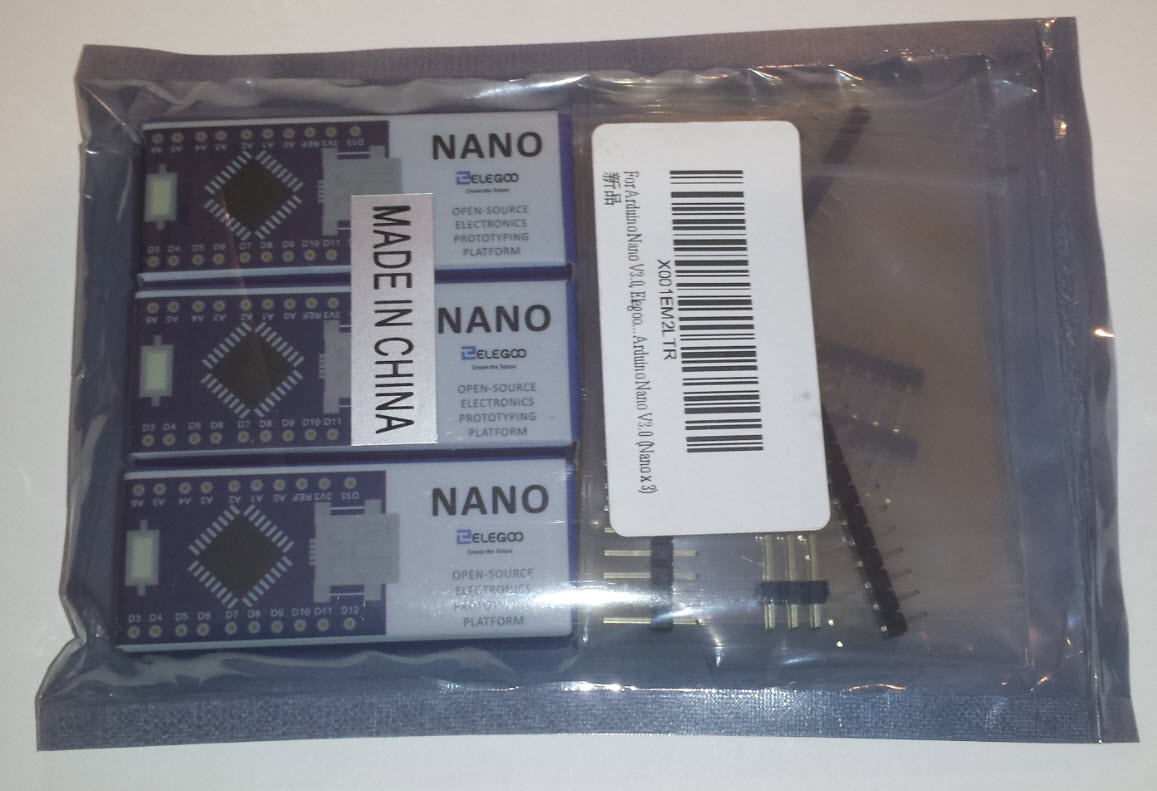
A three-pack of Arduino Nano microcontrollers sells for $8.79, or did
when the packet above was purchased. That is less than
$3.00 each. Unbelievable! For previous Arduino studies I had used the
popular Uno board, being only vaguely aware of other options.
The Nano is smaller than the Uno and boasts nearly
the same functionality. It supports eight analog channels, as compared
to
the Uno’s
six. However, it has only a single power
jack (a USB micro socket), while the Uno has an additional round
connector and on-board regulator, so that it can be powered from a 9
volt battery or etc.
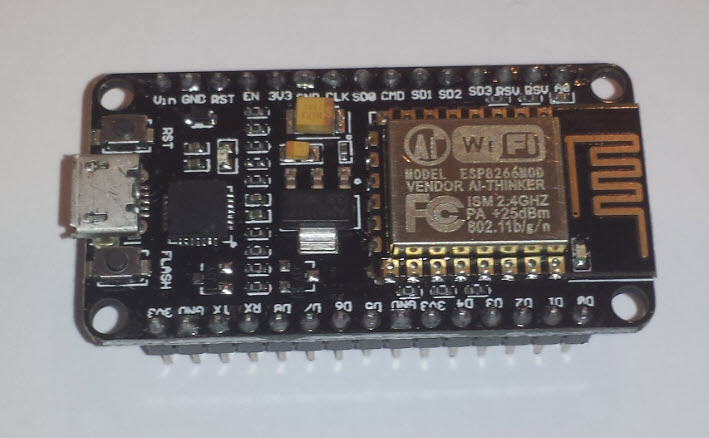 It is also possible to purchase a Wi-Fi enabled Nano—that
is, a Nano with Wi-Fi on the same PCB. The form is slightly
larger, but not by much, and the cost a little more than for the
plain version. The project I am going to describe is based on one of
these Wi-Fi enabled controllers.
It is also possible to purchase a Wi-Fi enabled Nano—that
is, a Nano with Wi-Fi on the same PCB. The form is slightly
larger, but not by much, and the cost a little more than for the
plain version. The project I am going to describe is based on one of
these Wi-Fi enabled controllers.
Background:
For ham radio high frequency operation we use a vertical antenna. Our house sits
on a small lot and,
due to HOA restrictions
it was necessary to locate the antenna in the back, away from street
view. With limited space available we were able to deploy only 14
radials, half along a six-foot strip at the back and half along the
east side of the house. Nevertheless the antenna performs surprisingly
well.
The
hypothesis:
Based on casual observation we felt that radio reception using the
vertical antenna improves after a good rain,
other things being equal. Rain of course soaks the ground
where the
radials are buried, and water makes the ground more conductive. We
think this change affects antenna performance in a favorable way. On
the
other hand, a great many factors influence high frequency radio
reception. (Other things
are never equal.) It
is
possible that our observations are nothing more than coincidence or
imaginative interpretations. Nevertheless, while casting about
for something interesting to do with Arduino it occurred to me that the
ground conductivity hypothesis might be put to the test by acquiring
data
on ground moisture or wetness, together with some sort of systematic
assessment of
antenna
performance. While it was far from evident what the latter might be, I
thought it could be fun and instructive to tackle automatic ground
moisture monitoring using an Arduino.
Agriculture:
Although my interest in the subject relates primarily to
radio reception, on searching the Internet I discovered that the main
reason for sensing or measuring the water content of
soil has nothing to do with radio. It is instead about growing crops
efficiently! The first article I read came from a physics conference,
and then there were several articles from university engineering and
agriculture departments. Technical methods described in these articles
seemed complex: impedance of soil at radio
frequencies, time domain
reflectometry, even an
atomic method based on the fact that hydrogen in soil absorbs gamma
rays. To be fair, a few articles touched on simpler methods and
low-cost
probes, but it wasn’t until the context shifted to home
gardening that readily accessible search
results began to appear.
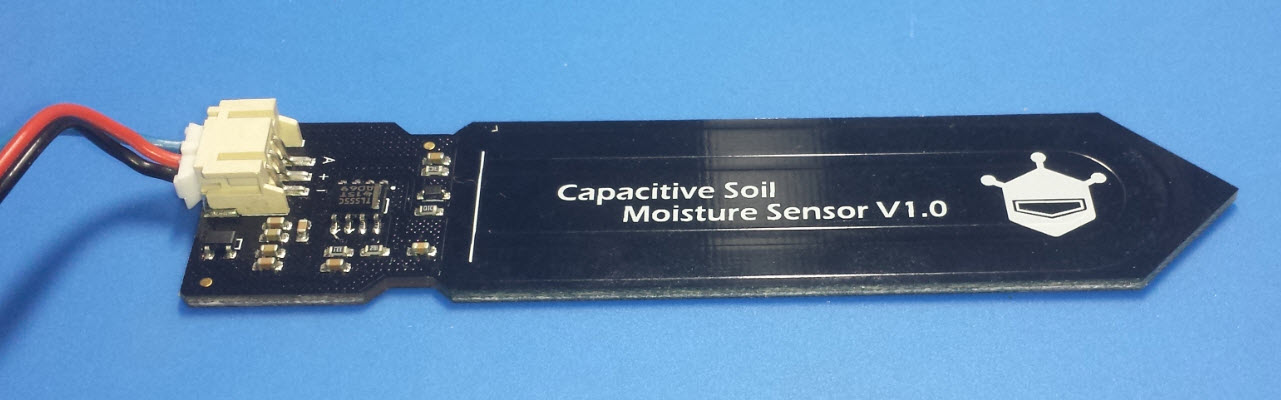
 The sensor pictured on the left sells for $12.90 from Amazon and is suitable for use
with potted plants or similar applications where it can be protected
from
weather. On seeing a reference to this sensor I guessed that it could
be
used to test the Arduino-based data acquisition concepts, if
not to
exercise all components of the project, except whatever probe would
eventually be deployed in the
ground outside.
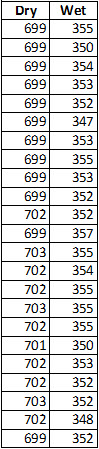
Using a Nano (not Wi-Fi enabled) I tested the sensor dry and then
dipped it into a glass of water. To my great pleasure numbers displayed
via the Serial channel reflected the difference unambiguously.
I am omitting details at this point, but the difference
between wet and dry from the 10-bit A/D conversion was on the order of
a few hundred (table excerpt on right).
The sensor pictured on the left sells for $12.90 from Amazon and is suitable for use
with potted plants or similar applications where it can be protected
from
weather. On seeing a reference to this sensor I guessed that it could
be
used to test the Arduino-based data acquisition concepts, if
not to
exercise all components of the project, except whatever probe would
eventually be deployed in the
ground outside.
Using a Nano (not Wi-Fi enabled) I tested the sensor dry and then
dipped it into a glass of water. To my great pleasure numbers displayed
via the Serial channel reflected the difference unambiguously.
I am omitting details at this point, but the difference
between wet and dry from the 10-bit A/D conversion was on the order of
a few hundred (table excerpt on right).
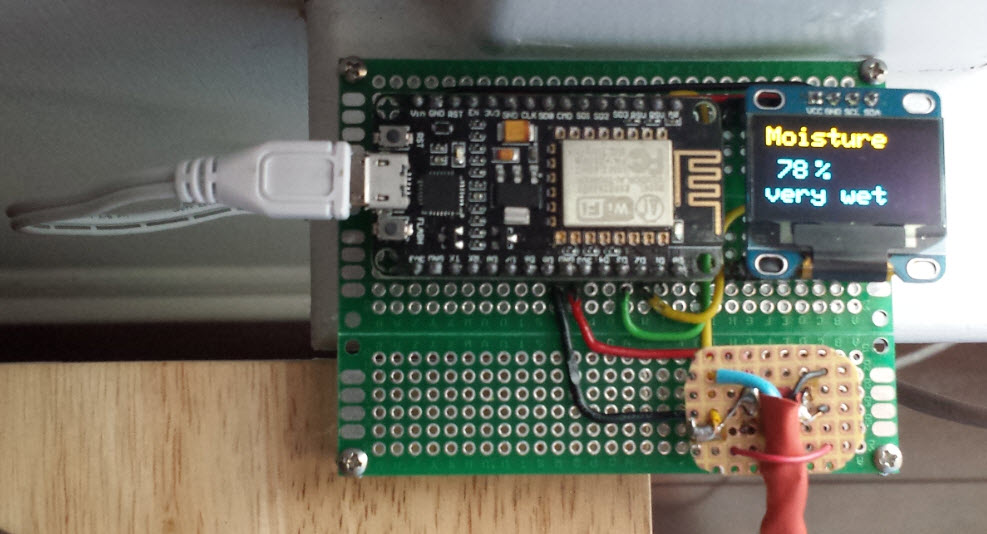
Internet
of Things:
It was obvious that if the planned application should not have to
remain connected
to a computer all the time, some means of displaying or storing
data would be needed that did not rely on the computer’s serial
interface. My
wife had previously experimented with a temperature and humidity demo
application that interacted with an on-line ‘Internet of
Things’
platform https://thingspeak.com/,
and also in another separate part displayed
values on a small Oled module.
I decided to combine these ideas, essentially to construct a hybrid of
demonstration examples, for sensing, displaying, and uploading ground
wetness data.
To connect to the Internet without being
tethered to a computer meant switching to a Wi-Fi enabled Nano.
This change incurred a potential disadvantage. The single board Wi-Fi
Nano has only one designated analog pin A0,
compared to the eight A/D channels available in the regular version.
This means
that only one sensor probe could be connected to the controller.
Testing with the capacitive sensor was
efficient, because the sensor recovers from wet to dry instantly.
Evidently electrodes embedded in the PCB material do not get wet and
the outside surface is easily wiped dry. Once the program (Arduino
sketch) was working satisfactorily
with this test sensor I began
to wonder how much trouble it would be to substitute a more durable or weather
resistant sensor. Up to this point I had set aside the issue
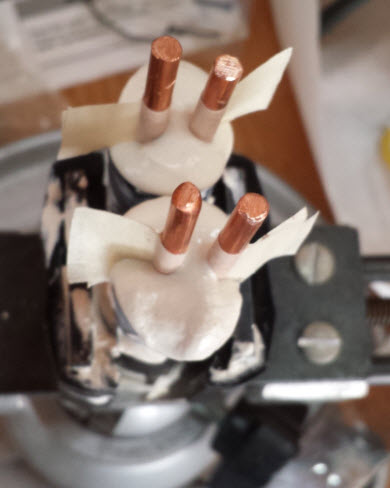
of a practical or deployable sensor. But then I hit upon an article describing a resistive probe made from junk parts and
plaster-of-paris: http://www.cheapvegetablegardener.com/how-to-make-cheap-soil-moisture-sensor-2/.
This simple probe seemed almost too good to be true.
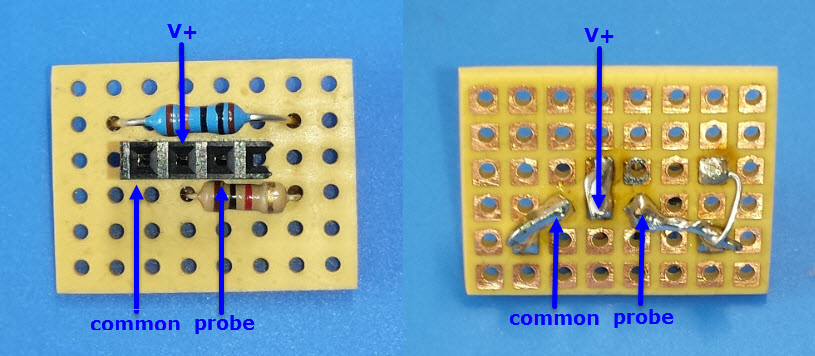
Probe
studies:
Over several days I made a few probes of different sizes but similar to
the one described in the ‘Cheap Vegetable Gardener’
article. After probes had dried for a day or two I
bench-tested
them under various conditions. The results were befuddling at first.
When wet or just damp, the probes were batteries, reading somewhere
in the range of 10 to 80 millivolts. They also retained an applied test
voltage after disconnection. For one of them I measured the
time constant using a 100K resistor in parallel. The value was 20
seconds, meaning the capacitance was a whopping 200 μF. Subsequently on
applying
low-level (sine wave) test signals from 1 KHz to 1 MHz and measuring
the probes’
effect on these signals I became increasingly confused. Finally I
abandoned this approach and instead applied 5 volts DC to a voltage
divider, of which one component was the probe. Regarding the probe as a
resistor led at last to reproducible test values.
Although calibration values (minimum and
maximum numbers) differ between the capacitive probe and these
homemade probes, which also differ to a lesser degree among themselves,
I
thought it should be possible to connect either type probe to the
Arduino without rewiring. To this end I made an adapter for the gypsum
probes so they could be plugged into the same 3-pin header as the
capacitive
probe. The header is wired to a 3.3 volt Nano pin for V+. As far as I
know
it doesn't matter (except for calibration) whether V-in or a 3.3 volt
source is used.
 ThingSpeak:
This open-source ‘Internet of Things’
resource provides truly amazing capabilities to the amateur
experimenter, including integration with the powerful MATLAB
computing platform (See https://thingspeak.com/,
also https://en.wikipedia.org/wiki/ThingSpeak).
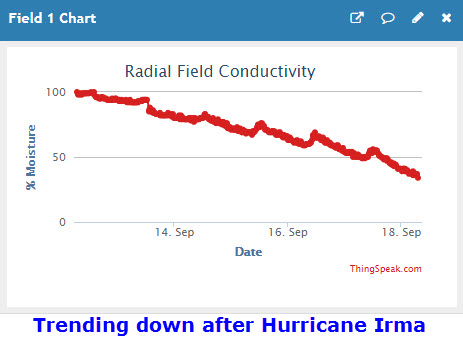
I decided to give my first ThingSpeak chart
a high-sounding title,
while in
truth the physical meaning of its source data is a bit shaky.
Perhaps with
further experimentation and calibration it would be possible to
transform sensed values to millisiemens or some such standard for
consistency,
but that goal seems fanciful at this point. It is also unclear how probe
conductivity relates to
soil conductivity—gypsum
is not soil. On the other hand it might be fair to assume that over a
long time period
the probe’s moisture
content will come to match that of surrounding soil. I am
not sure.
ThingSpeak:
This open-source ‘Internet of Things’
resource provides truly amazing capabilities to the amateur
experimenter, including integration with the powerful MATLAB
computing platform (See https://thingspeak.com/,
also https://en.wikipedia.org/wiki/ThingSpeak).
I decided to give my first ThingSpeak chart
a high-sounding title,
while in
truth the physical meaning of its source data is a bit shaky.
Perhaps with
further experimentation and calibration it would be possible to
transform sensed values to millisiemens or some such standard for
consistency,
but that goal seems fanciful at this point. It is also unclear how probe
conductivity relates to
soil conductivity—gypsum
is not soil. On the other hand it might be fair to assume that over a
long time period
the probe’s moisture
content will come to match that of surrounding soil. I am
not sure.
Uploading data to ThingSpeak requires an
Internet connection, of course, and that is where it is helpful to have
a Wi-Fi enabled Nano. The
procedure for connecting the device to a wireless router is explained here.
Given the tiny foil antenna it was a little surprising that the
connection works reliably from one end of our house to the other. But
then why not?—cell
phones also have a good Wi-Fi connection throughout the house and yard.
The client setup for
ThingSpeak is
also well explained on-line, and with demonstration examples.
Finally, the
sketch for this project
illustrates all these pieces—the
sketch is basically an assemblage of examples, tweaked specifically for
the soil moisture study.
Next Steps:
To make further progress on the question that suggested
this project in the first place, it will be necessary to identify one
or more suitable
comparison measures of antenna performance. Ideally, analogous
procedures could be devised for acquiring such data automatically.
Although none of this is in hand, and may never come to fruition, I
have been reading ahead a little about how to assess relationships
between time series. It is important when comparing time series to sift
out potentially confounding effects, such as mutual unrelated dependence on
time. Not surprisingly, this requirement leads to challenges of a
statistical nature.
Wi-Fi Enabled Nano
Demo: Nano/Soil_moisture_monitor.mp4
Project descriptions on this page are intended for entertainment only.
The author makes no claim as to the accuracy or completeness of the
information presented. In no event will the author be liable for any
damages, lost effort, inability to carry out a similar project, or to
reproduce a claimed result, or anything else relating to a decision to
use the information on this page.